
If you love treats that perfectly blend simplicity and a satisfying crunch, you are absolutely going to adore this 3-Ingredient Homemade Crunch Cups Recipe. It’s the kind of dessert that feels indulgent but comes together with just a few ingredients you probably already have in your kitchen. With silky melted chocolate, a touch of buttery richness, and the irresistible snap of crispy rice cereal, these cups pack a delightful texture and flavor punch that will have everyone asking for more. Whether you’re after a quick afternoon pick-me-up or a fuss-free party treat, these crunch cups hit the spot every time.
Ingredients You’ll Need
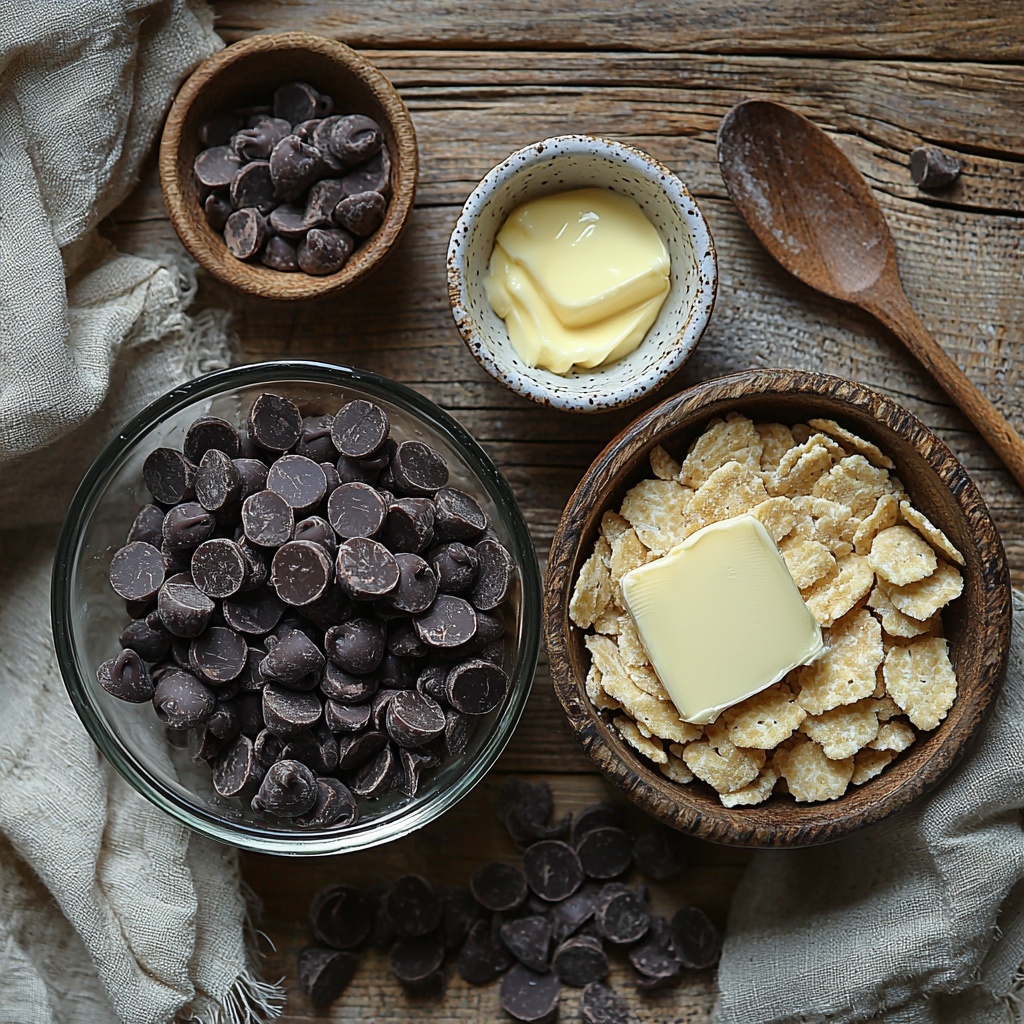
This recipe shines because it relies on just three simple yet essential ingredients, each adding a unique touch to the final crunch cups. The balance between smoothness, butteriness, and crisp texture is what makes the magic happen.
- 1 1/2 cups semisweet chocolate chips: Choose good-quality chocolate for that rich, luscious base that melts beautifully and sets with a glossy finish.
- 2 teaspoons melted unsalted butter (or coconut oil): This adds a silky smooth texture and helps the chocolate set with a slight sheen, plus a subtle buttery depth.
- 3/4 cup crispy rice cereal: The star crunch—light, airy, and perfectly crispy to contrast the creamy chocolate coating.
How to Make 3-Ingredient Homemade Crunch Cups Recipe
Step 1: Prepare Your Muffin Tin
Start by grabbing your mini muffin tin and giving it a good spray with cooking spray. This step is crucial because it ensures your crunch cups will come out of the tin easily, retaining their perfect dome shape.
Step 2: Melt the Chocolate Chips
Place the semisweet chocolate chips in a microwave-safe bowl. Heat in short bursts of 30 seconds, stirring well after each, until the chocolate becomes silky smooth. This gentle melting prevents burning and helps you achieve that perfect pourable consistency.
Step 3: Incorporate the Melted Butter
Mix the 2 teaspoons of melted unsalted butter or coconut oil into the melted chocolate. This little addition makes the chocolate mixture glossy and a bit softer, which will give your crunch cups a wonderful mouthfeel once set.
Step 4: Fold in the Crispy Rice Cereal
Next, gently fold your crispy rice cereal into the chocolate mixture, coating every bit evenly. The goal is to ensure every crunchy piece gets a smooth chocolate hug without breaking the cereal bits.
Step 5: Fill the Muffin Tin Cups
Spoon the chocolate and cereal mixture into the prepared mini muffin tin. Press down lightly to pack each cup, but don’t overdo it—you want them tightly formed but still airy and crunchy.
Step 6: Freeze and Set
Pop the muffin tin into the freezer for about 10-15 minutes, or until the crunch cups are firm to the touch. Once set, carefully remove each cup from the tin, and voilà, you have your perfectly shaped homemade treats ready to enjoy!
How to Serve 3-Ingredient Homemade Crunch Cups Recipe
Garnishes
While these crunch cups are delicious on their own, a sprinkle of sea salt or a few colorful sprinkles on top before freezing can add a fun twist. You can also drizzle a little white chocolate over them for a pretty contrast and extra sweetness.
Side Dishes
Serve these delightfully crunchy chocolate cups alongside a scoop of vanilla ice cream or fresh berries for a charming dessert plate that balances cool creaminess with crunchy chocolate. They also pair perfectly with a hot cup of coffee or tea for a cozy afternoon treat.
Creative Ways to Present
Try presenting your 3-Ingredient Homemade Crunch Cups Recipe in mini cupcake liners for a polished, gift-ready look. Layer them in a pretty glass jar or arrange on a tiered dessert tray for parties. They’re also fantastic wrapped individually in cellophane tied with a ribbon for easy sharing.
Make Ahead and Storage
Storing Leftovers
Keep any leftover crunch cups in an airtight container at room temperature if your kitchen is cool, or in the refrigerator to maintain their shape and crunch. They usually stay fresh for up to a week, perfect for snacking throughout the week.
Freezing
If you want to make these ahead of time or store extras, they freeze beautifully. Arrange the cups in a single layer on a parchment-lined tray, freeze until solid, then transfer to a freezer-safe container or zip-lock bag. They can last up to three months.
Reheating
Because these cups are best enjoyed cold and crunchy, reheating isn’t necessary. If they soften a bit, simply pop them back in the fridge or freezer for a few minutes before serving to bring back their satisfying firmness.
FAQs
Can I use milk chocolate instead of semisweet chocolate?
Absolutely! Milk chocolate will make the cups sweeter and creamier, while semisweet offers that rich chocolate flavor with a hint of bitterness. Choose based on your sweetness preference—both work wonderfully.
Is coconut oil a good substitute for butter?
Yes, coconut oil is a great dairy-free alternative that adds a subtle coconut flavor. It also helps the chocolate set nicely. Just be sure to use melted coconut oil and not solid chunks to incorporate smoothly.
What if I don’t have a mini muffin tin?
You can use a silicone mold or small cupcake liners placed on a baking sheet to shape these cups. Just ensure the mold or liners have a sturdy base for easy handling once frozen.
How crunchy are these cups? Will the cereal get soggy?
The chocolate coats the cereal well, sealing in the crunch. As long as they’re stored properly in a cool, dry place, the crispy rice cereal remains satisfyingly crunchy for days.
Can I add nuts or other mix-ins to the recipe?
Definitely! Adding chopped nuts, mini marshmallows, or even a sprinkle of sea salt can elevate the texture and flavor. Just fold them in gently with the cereal before filling the cups.
Final Thoughts
This 3-Ingredient Homemade Crunch Cups Recipe is a shining example of how simple ingredients can come together to create an irresistible treat. Whether you’re making them for a quick snack or a festive occasion, their ease, deliciousness, and satisfying crunch make them a constant favorite in my kitchen. Give them a try—you might just find yourself whipping up a batch again before you know it!
Print
3-Ingredient Homemade Crunch Cups Recipe
- Prep Time: 10 minutes
- Cook Time: 0 minutes
- Total Time: 25 minutes
- Yield: 12 servings
- Category: Dessert, Snack
- Method: No-Cook
- Cuisine: American
- Diet: Vegetarian
Description
These 3-Ingredient Homemade Crunch Cups are a quick and easy no-bake treat combining smooth chocolate with crispy rice cereal for a delightful crunch. Perfect for a simple dessert or snack, they require minimal ingredients and effort, ready in under 30 minutes.
Ingredients
Ingredients
- 1 1/2 cups semisweet chocolate chips
- 2 teaspoons melted unsalted butter (or coconut oil)
- 3/4 cup crispy rice cereal
Instructions
- Prepare the muffin tin: Spray a mini muffin tin thoroughly with cooking spray to prevent the chocolate cups from sticking after freezing.
- Melt the chocolate: Place the semisweet chocolate chips in a microwave-safe bowl and microwave in 30-second intervals, stirring between each, until the chocolate is melting and smooth.
- Add butter or coconut oil: Stir the melted unsalted butter or coconut oil into the smooth chocolate to create a glossy and slightly thinner texture for easier mixing.
- Mix in crispy rice cereal: Fold the crispy rice cereal into the chocolate mixture, ensuring every bit of cereal is coated evenly for consistent crunch in each cup.
- Fill the muffin tin: Spoon the chocolate-cereal mixture into each mini muffin cup and gently press it down to pack the mixture so the cups hold their shape.
- Freeze until firm: Place the muffin tin in the freezer for 10 to 15 minutes to allow the chocolate to harden. Once firm, carefully remove each crunch cup from the tin to serve.
Notes
- You can substitute unsalted butter with coconut oil for a dairy-free option.
- Ensure the chocolate is completely melted but not overheated to maintain a smooth consistency.
- Use mini muffin tins for perfectly sized crunchy cups, but silicone molds can also work for easy removal.
- Store the crunch cups in an airtight container in the refrigerator or freezer for extended freshness.
- Optional: Add a pinch of sea salt on top before freezing for a sweet-salty twist.


